Free Tool
SimpleFert — A Nutrient Program Tool
An extremely simple nutrient program tool built for hydroponics. Works in Google Sheets. Free download.
※A Google account is required. When you press the button, a copy confirmation dialog opens on a Google page.
Getting started
SimpleFert is a read-only template — you can’t edit the original sheet directly. Use the “Copy to Google Drive” button above to copy it into your own Drive. All you need is a Google account; nothing else to set up.
Once copied, it behaves like any other spreadsheet. Team sharing and version history are handled by Google out of the box.
Why this tool
When you are running a nutrient program on the production floor, the existing tools have so many features that you get lost every time you open them. Meanwhile, a homemade spreadsheet stops being maintained the moment the person in charge changes. I have seen this happen again and again.
SimpleFert narrows the inputs down to five. It works for both the initial nutrient solution (nutrient solution refresh) and nutrient replenishment (stock solution), and there is almost nothing to memorize. When you hand it off to the next person in charge, the explanation fits into a few minutes.
How to use SimpleFert
Once you have copied the sheet, start by opening the “design” tab. The gray cells on the left half of the screen are the only input fields. Some of the white cells contain formulas. Unless you are modifying the sheet itself, leave them alone.
There are only five inputs.
1. Volume
What you enter depends on whether you are preparing the initial nutrient solution (for a nutrient solution refresh, for example) or preparing nutrient replenishment.
- For the initial nutrient solution (e.g. nutrient solution refresh): the total water volume of the nutrient solution. Enter the water volume that includes the nutrient reservoir and the grow bed together.
- For making stock solution for nutrient replenishment: the combined water volume of Part A and Part B. If you are making 200 L of Part A and 200 L of Part B, enter 400 L.
2. EC setpoint
Enter the EC setpoint for your crop.
3. Reference formulation
You can check whether the nutrient solution you have designed is higher or lower in each nutrient than a commonly known formulation. If a nutrient is 10% or more higher than the reference formulation, it is flagged as “High”; 10% or more lower is flagged as “Low”; and values that are roughly the same are flagged as “Optimal.”
If you do not need the comparison, select “None” in the reference formulation field.
4. Raw water
Enter the composition of the water you are going to use, in mg/L. It is better to use values that are as accurate as possible — for example, by commissioning a lab analysis. Municipal water quality reports can also be a useful reference.
Depending on the raw water, a particular component may be too high, which can throw off the nutrient solution balance.
The units you enter depend on how the analysis report is written — on an “element notation,” “ion notation,” or “oxide notation.” You need to convert to the unit the sheet expects before entering the value. If the units differ, see the “How to use the unit conversion sheet” section below.
5. Fertilizer amounts
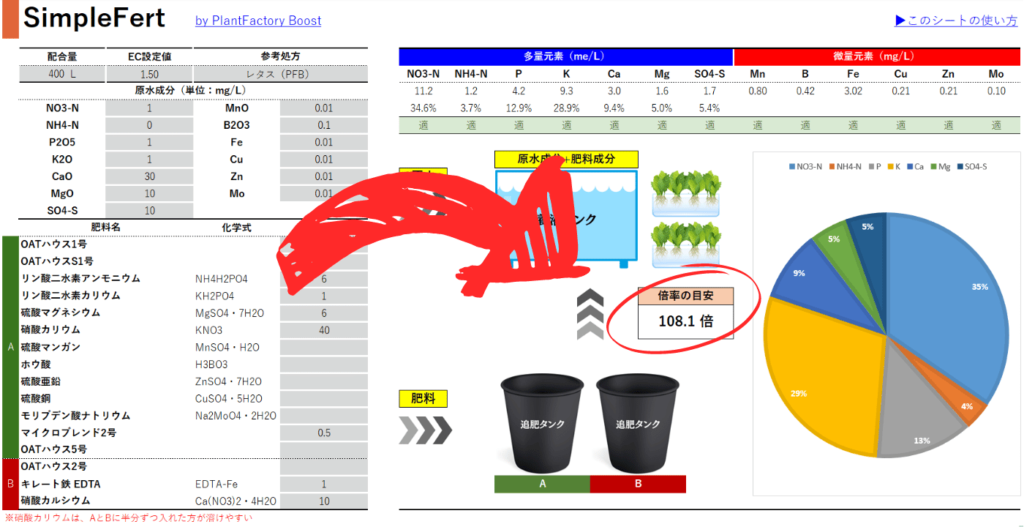
Enter the actual amount of fertilizer you are using, in kg. Once you enter it, the calculated results (nutrient concentrations, ratios, concentration factor) appear on the right side, and you adjust the fertilizer amounts while monitoring those results.
When deciding the amounts, it works best to start with calcium nitrate. As a rule, nutrients that are supplied by more than one fertilizer are decided last.
Calcium, for instance, comes only from calcium nitrate unless you are using another calcium fertilizer alongside it. Starting with nutrients that come from only one fertilizer makes the adjustments afterward fall into place more easily.
Once you have matched the calcium concentration with calcium nitrate, use potassium nitrate next to supply nitrogen and potassium at the same time, and finally decide the phosphate and magnesium fertilizers.
The size of each adjustment does not have to be precise. If you want to “reduce calcium” from the last recipe, a rough estimate like 5–10% less is enough.
How to read the results
Nutrient display: the top row shows the nutrient concentration, the bottom row shows the ratio. The units differ between macronutrients and micronutrients (mEq/L and mg/L). When you enter the fertilizer amounts, the nutrient concentrations in the nutrient solution at your EC setpoint are calculated. Strictly speaking they are approximations, but the precision is sufficient for practical use. If you have selected a reference formulation, you can also check the comparison result as “Optimal,” “High,” or “Low.”
About the concentration factor
The “concentration factor” tells you how many times more nutrient solution you can make with the amount of fertilizer you have entered. The lower the EC setpoint, the more nutrient solution you can make, so the factor goes up.
When you are making the initial nutrient solution — for a nutrient solution refresh, for example — the factor approaches 1. More precisely, you adjust the fertilizer amounts so that it approaches 1. Doing so prevents problems like “the EC came out too high” or “too low” when you are mixing the nutrient solution.
When you are making stock solution for nutrient replenishment, the factor becomes a high number (like 100× or 200×).
How to use the unit conversion sheet
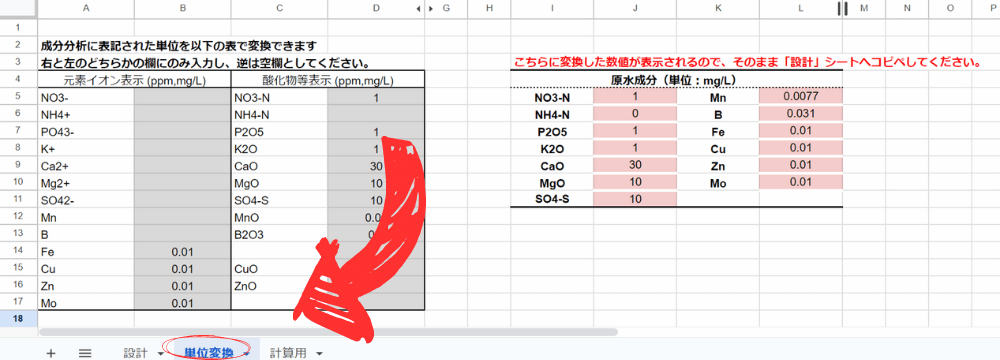
Water quality analysis reports use several unit conventions — “element notation,” “ion notation,” “oxide notation,” and so on. You need to convert them to the units the SimpleFert “design” tab uses.
Open the “unit conversion” tab and enter the analysis report you have on hand into whichever field (left or right) matches your report. The converted values appear on the right, and you copy those straight into the Raw water field on the “design” tab.
About fertilizer types and reference formulations
The sheet comes preloaded with commonly used straight fertilizers. This alone covers most nutrient programs.
You can add more fertilizer types. It supports not only straight fertilizers but also pre-mixed fertilizers. That said, formulas are embedded in the sheet, so if you are not confident about editing it, leaving the sheet unchanged is the safer choice.
Reference formulations can be added the same way. If you have a formulation specific to your own facility, add the formulation name and its values and it will show up in the dropdown.
Why “manual entry” instead of “automatic fertilizer calculation”
Most other nutrient program tools work the other way around: you enter the target nutrient concentrations, and the tool calculates the fertilizer amounts for you. SimpleFert deliberately inverts this — you enter the fertilizer amounts, and the nutrient concentrations are displayed.
That is because a nutrient program on the production floor is not about computing “the right answer” from scratch every time. It is a sequence of small adjustments from the last recipe. You look at the nutrient solution analysis results and think, “let’s reduce calcium a bit,” “let’s push potassium nitrate up a little,” and you nudge the previous recipe step by step. That is what the work actually feels like.
Tools that auto-calculate tend to create the illusion that “this number is the correct answer,” and that gets in the way of what really matters: the mindset of flexible adjustment. SimpleFert simply turns the “enter → look at the result → fine-tune” loop into a tool. The longer you have been running a nutrient program on the production floor, the more intuitive it should feel.
The thinking behind this is covered in detail in Chapter 6, “Handling Fertilizers,” of my book 172 Tips to Make Your Vertical Farm More Profitable.
Further reading
If you want to learn more about nutrient programs, see also How to build a nutrient solution with straight fertilizers — practical tips.
172 Hints to Boost Your Vertical Farm Profitability
Learn More